|
1. My shade will not raise evenly (click to expand / hide information)
Make sure that all the rings are attached on the back of the shade and that the lift cords are running through them smoothly and are attached to the bottom ring.
If not we may need to bring the shade in for repair.
Make sure that the rings are level with each other across the back of the shade.
If not the shade will need to be remade.
Check if it is a cord lock shade or a CCL shade.
Cord Lock Shade
Make sure that the cords are not wrapped around each other or tangled.
Make sure that the cords run freely through the cord lock and the pulleys and down the back of the shade. Check that the cord shroud is not interfering with the lift cord.
Raise and lower the shade several times by pulling the lift cords and engaging the cord lock at different levels. If one side of the shade is dropping lower than the other, then the shade needs a new cord lock.
If a shade needs a new cord lock, we can send one out or we can bring it in for repair. Instructions for replacing a cord lock are on the Downloads (click here) page.
CCL Shade (click here to view picture of CCL components)
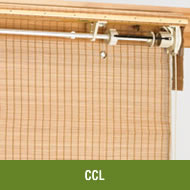
The lift cords for the CCL shade wrap around a fiber-glass shaft. Each lift cord is secured next to a bracket. Each lift cord is attached with a C-shaped cord clip.
Lower the shade fully. Make sure:
The cord clips are all the same distance from the brackets next to them.
The cord clips are all aligned with each other.
The cords are not hanging up on the bracket or any other obstruction.
If all these conditions are met, the shade will raise evenly.
2. CCL is not lifting the shade (click to expand / hide information)
Pulling the cord loop turns the clutch. The clutch is attached to the fiber-glass shaft by a disc, which is held in place by 2 set screws. The cords wrap around the shaft and are secured with C clips, so when the shaft turns, the cords wrap around it. (click here to view picture of clutch and components)
Make sure:
The lift cords are attached to the bottom ring of the shade and that each lift cord is not broken. If one or more cords are broken, the cord will have to be replaced.
We can send out cord or bring the shade in for repair.
The lift cords wrap around the fiber glass shaft and are securely attached using the C clips. If not, re-attach the cords. Instructions for re-cording a CCL shade are on the Downloads (click here) page.
The clutch turns when the cord is pulled. If not, either something is obstructing it or the clutch is broken. If the clutch is broken, it will need to be replaced. Instructions for replacing a clutch are on the Downloads (click here) page.
We can send out a new clutch or bring the shade in for repair.
Note: it is very unusual for the clutch to break.
If the clutch turns and the shaft does not, check if the disc is securely attached to the shaft. Make sure the set screws are tightly in place and are gripping the shaft.
If the customer cannot fix this, we will need to bring the shade in for repair.
3. Broken Cord Loop for CCL shade (click to expand / hide information)
It is very simple to replace a cord loop. A replacement clutch is not needed. The customer just needs to receive a new cord loop from us and they can then remove the clutch cover and remove the old loop, replacing it with the new one.
The new loop will come with a new cord tensioner attached.
Instructions for changing a cord loop are on the Downloads (click here) page.
4. Broken Cord Lock (click to expand / hide information)
If a cord lock breaks, it has to be replaced.
Replacing a cord lock takes about 10 minutes, but it requires the shade to be taken down and placed on a flat surface.
Simple steps to replacing a cord lock are:
Remove the tassels and cord stops
Pull the cords through the cord lock
Remove the cord lock and replace with the new one
Thread the cords back through the cord lock
Replace the cord stops and tassels
Instructions for replacing a cord lock are on the Downloads (click here) page.
5. Broken Lift Cord (click to expand / hide information)
Broken lift cords need to be replaced with the same type of lift cord. Check if the shade is a cord lock shade or a CCL shade.
Cord Lock Shade
If a lift cord breaks, it has to be replaced.
Replacing a lift cord takes about 10 minutes, but it requires the shade to be taken down and placed on a flat surface.
Simple steps to replace a lift cord are;
Remove the tassels and cord stops
Remove the old cord and untie from the bottom ring
Thread the new cord from the bottom ring up the shade, through the loops of the cord shroud, through the grommet, through the pulley and cord lock.
Replace the cord stop and tassel
CCL Shade
The lift cords for the CCL shade wrap around a fiber-glass shaft. Each lift cord is secured next to a bracket. Each lift cord is attached with a C-shaped cord clip. (click here to view picture of CCL shade components)
Replacing a lift cord is simple, but care must be taken to make sure the cord clip is properly spaced so that the shade raises evenly.
Simple steps to replace a lift cord are:
- Remove the C clip of the broken cord and remove the cord. Untie cord from the bottom ring
- Thread the new cord off from the bottom ring (but do not tie it yet).
- Attach cord to shaft with C clip
- Hang up the shade and then tie off cord at bottom of shade so that it is level with the other cords.
Instructions for replacing a CCL lift cord are on the Downloads (click here) page.
|


